How I created my Amazon Top 10 product pages
The initial setup process took some time but now I can create a new page in under 30 seconds.
I know that this guide was promised to be sent out last week, however with what was transpiring around the world I decided to pause the send until today.
At the end of the last issue I mentioned that I would give a rundown on how I made all the “Top X Products on Amazon” pages on the website but before we jump into that lets get a recap of how the website performed since our last update (January 5th).
Looking at the public analytics dashboard over at Plausible for the 5th through the 10th, we finally started to see a little search traffic (2 visitors from Google). What I like about Plausible is that it connects with my Google Search Console to help nail down the keywords that drove the traffic:
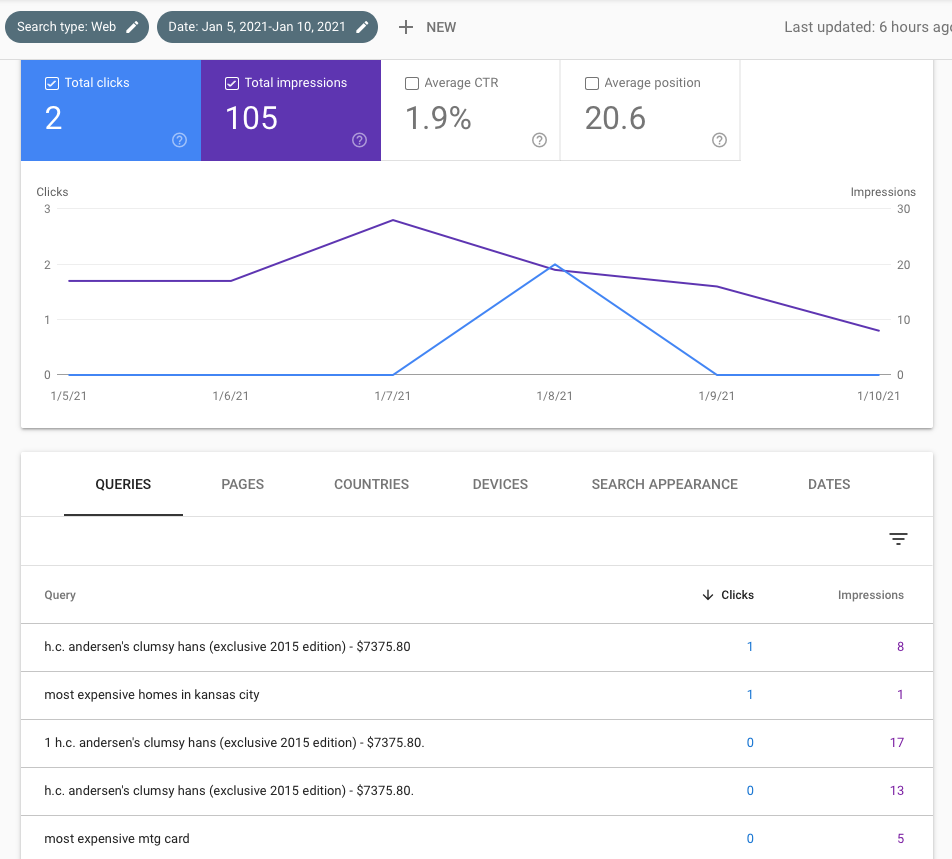
h.c. andersen's clumsy hans (exclusive 2015 edition) - $7375.80
most expensive homes in kansas city
Although that first search term seems very specific, it wasn’t me who searched for it.
The second search term is the very first visit I’ve seen to another set of pages created similarly to how the Amazon pages are built. I’ll save that guide for a later issue.
I also jumped into Google Search Console to double-check this search data and saw the website had 105 search impressions during the same period.
Still a little confused on so many specific “h.c. Andersen’s …” search phrases, but at least we are showing up in some results.
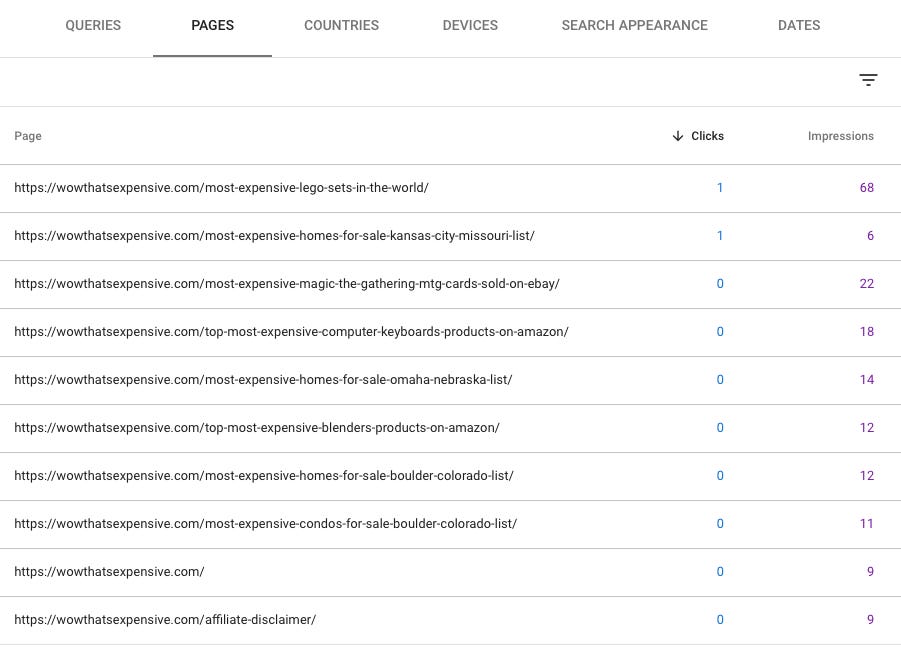
I then tabbed over to the “PAGES” tab and saw a breakdown of all the pages that received some search impressions. This one always confused me since the total impressions on this page are ALWAYS GREATER than the impressions you see on the “QUERIES” tab.
My final check (even though something similar in the GSC data), I always head over to Google using a private tab and search for site: wowthatsexpensive.com. I only do this once or twice a week. Last week it was showing around 20 results. This week … 70+!
So overall I’m really happy at how the website is performing at this stage of development and am actually really excited to see what the next couple of weeks bring in terms of search traffic.
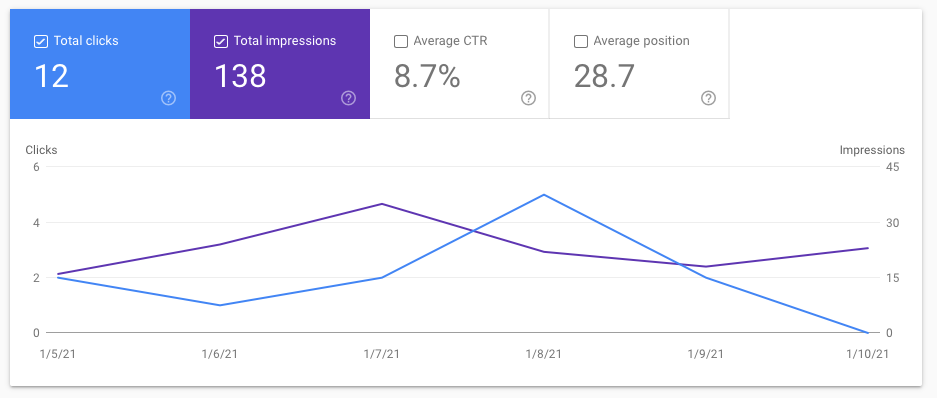
SNEEK PEEK: I actually launched two websites at about the same time to try out different SEO techniques. WTE is 100% custom coded using PHP / MySQL. The other website is running WordPress with a theme I purchased over at Theme Forest for less than $30. Here’s a look at that website’s GSC data for the same period of time as WTE:
As you can see it has about 30% more search impressions but what really sticks out is its 8.7% CTR versus WTE’s 1.9% CTR.
Why?
I’m 99.999% sure it deals with my copywriting of the page title (meta title) on the post getting all of that traffic.
27 of the best NFC tag uses and ideas (2021)
I’m noting this down to look into further this week, but I think I might be able to tweak the posts on WTE to match this style and hopefully see a CTR increase.
Every once in a while I’ll bring in some data from this other website, but the main focus in this journey will be on WTE.
What I have planned this week for WTE:
Building more Amazon pages. I don’t plan on building out hundreds, but I’m going to do a little research on some long-tail keywords that are pretty easy for rank for. I cancelled my AHREFS subscription this month because I needed to cut some costs so I’m going to reach out to Pat Walls to see what free alternatives he uses in his SEO planning.
NOTE: My cancellation at AHREFS was 100% because of budget. I love their service and continue to use their free service to track my websites, however I wasn’t using the premium options enough to justify the $99/month fee.Researching what Pat Walls calls are “content types” in his Lean SEO program. Although I have high hopes for the two main content types on WTE (Amazon, Real Estate), I know there are numerous others out there that fit the WTE content model … I just need to find them.
Go through a few more lessons over at Ahrefs Academy. I’ve been going through their “Marketing with Ahrefs” course as an SEO refresher and are using their techniques to rank the other website I mentioned in this issue.
That’s all I have right now for the update on WTE … now it’s time to get to what you’ve all been waiting for …
Here’s how I created the Amazon Top X product pages on WTE
(I definitely would’ve used a more catchy and SEO optimized headline if I were focusing this guide for search :) )
One of my goals of WTE was being able to create unique content in a highly scalable fashion that could easily be updated. (I know, that’s a mouthful)
Since WTE focuses on the “most expensive x”, as the website grows there is more and more content that needs to be maintained (updated), and I wanted to make sure at the beginning to focus on content that could be updated in a more automated fashion … say hello to the “Top X Products on Amazon” pages.
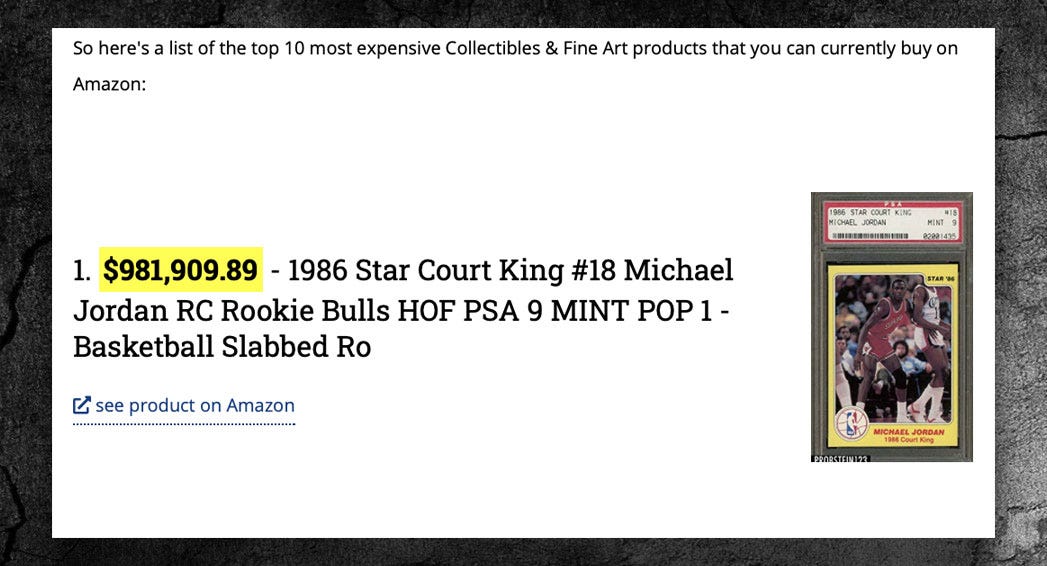
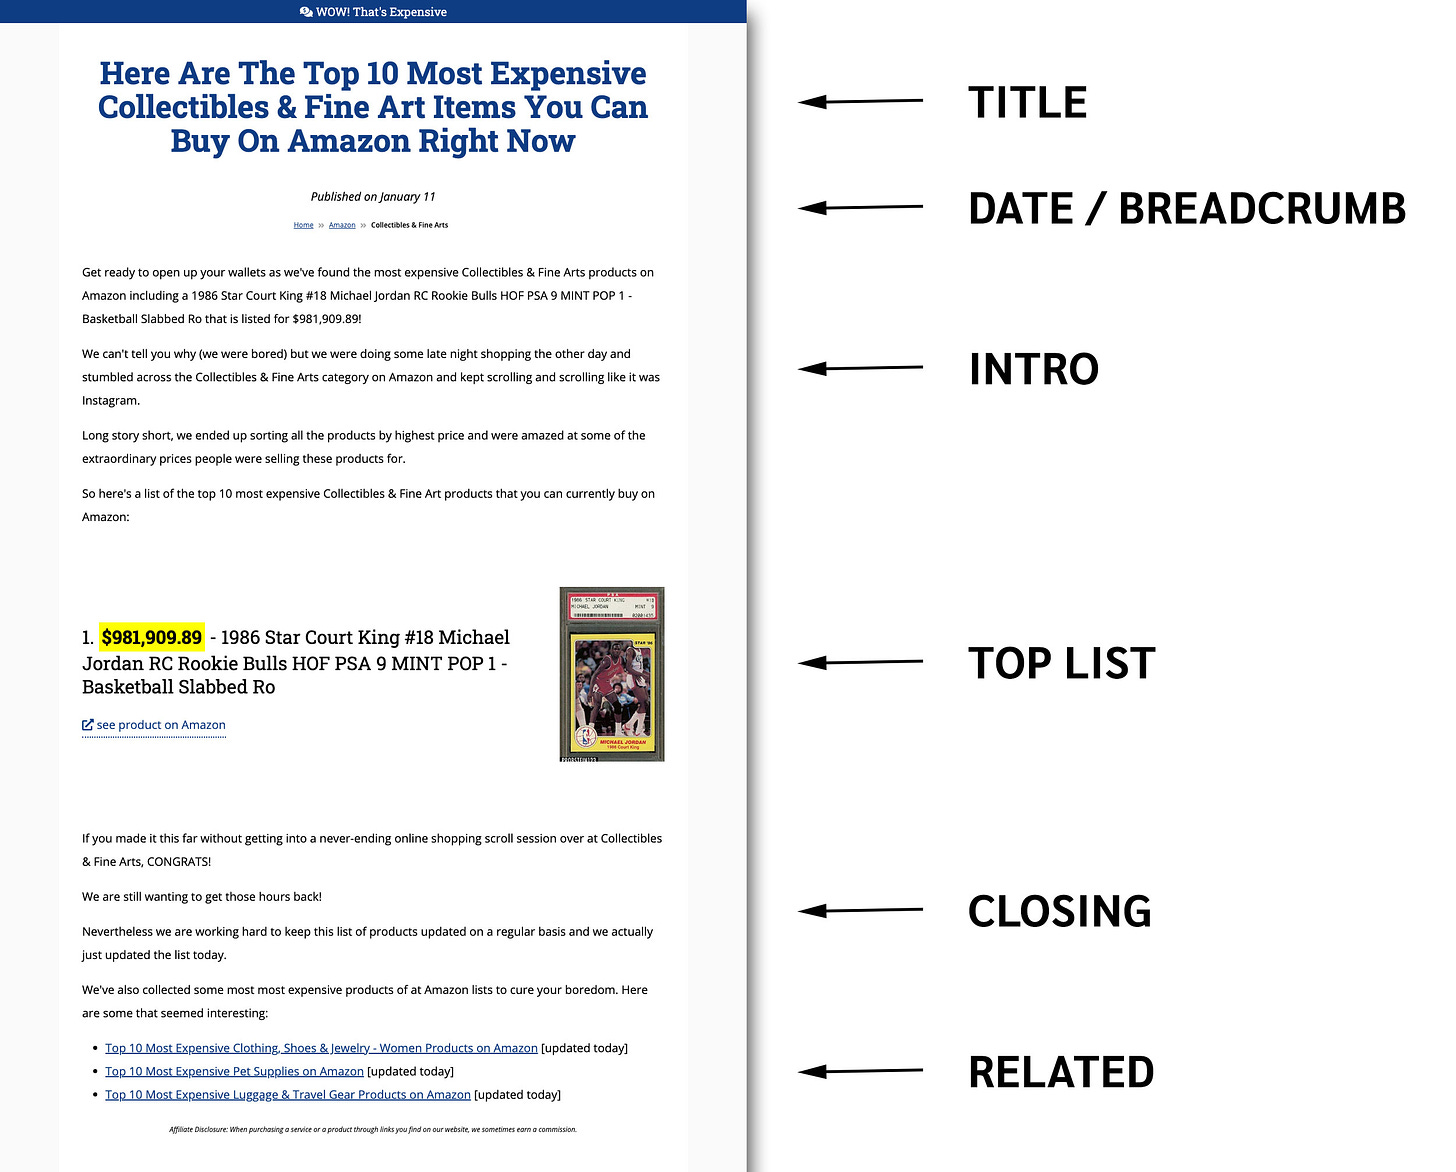
The screenshot above is from one of the 35 pages on the website using this system.
As you know Amazon has thousands of categories which would mean this content type, depending on how they perform on WTE, could be a huge future search traffic generator.
Pulling data from the Product Advertising API
To find all the highest priced products in Amazon’s catalog, I headed over to their Product Advertising API (couldn’t get a clean link so you’ll need to Google it) to see what data was available.
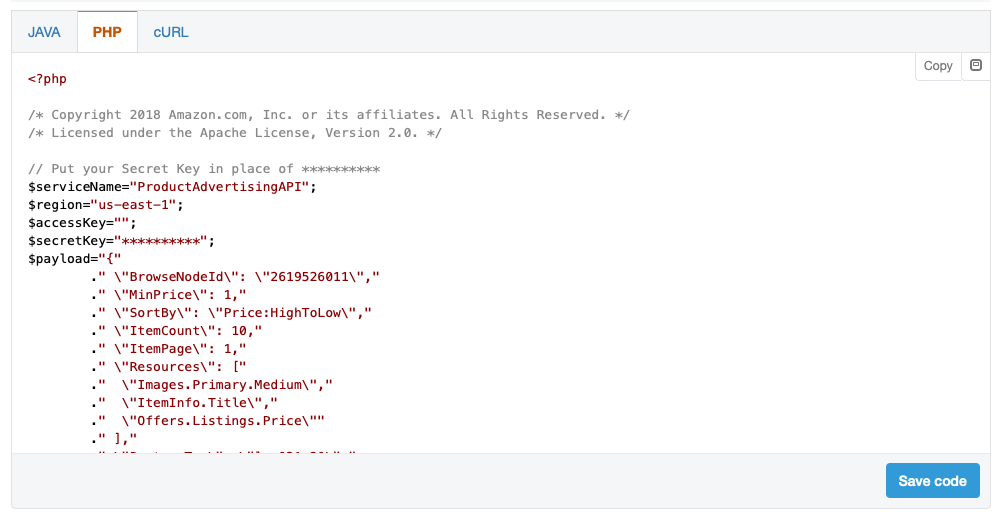
After reading for way too long I stumbled across the Product Advertising API 5.0 Scratchpad which allows you to build your query out AND will give you the exact code you’ll need to programmatically talk to the API to pull the data.
And this is where I ran into a small roadblock that took about 30 seconds to overcome after visiting the website Browse Nodes.
To query the API for a specific category you have to utilize Browse Node IDs but these identifiers are not easy to find, however using Browse Nodes they are a breeze.
I just went through the Browse Nodes website and pulled about 30 different identifiers for the initial batch of categories I wanted to build pages for.
1 Appliances 2619526011 Appliances Browse
I then took the browse node (2619526011) and entered that into the Scratchpad.
Next I set the MinPrice field to 1 because I didn’t want the “see price in cart” or “available at other sellers” results popping up at the top because those wouldn’t provide a price.
I set the SortBy to Price:HighToLow
ItemCount was set to 10 since all I wanted were the top 10 results.
The under resources I added:
Images.Primary.Medium: This would be the URL to the medium sized version of the product image.
ItemInfo.Title: The product title.
Offers.Listings.Price: The price of the product.
They had tons of other product data available, but since I was keeping this page as simple and clean as possible those are the only three I needed.
I clicked on the Code snippets > PHP section (since I use PHP) …
And I was ready to rock and roll to start pulling Amazon product data.
I then created a MySQL database with three tables:
Browse Nodes: So I can keep track of all the categories that we have product data for (and so the website knows what pages to display)
Products: All the pulled product information.
Browse Notes / Products Relationships: This table says “Product 123” is from “Browse Node” I set this up because a specific product could technically be listed in more than one Browse Node.
I’m going to skip over the full database setup for this project but if you want to learn more don’t hesitate to reply back to this email and we can chat.
One final note is that I have a cronjob that runs every couple of days pulling the most up to date list of products for each browse node so the posts will be as fresh as possible.
The product page layout
When I was building out the idea for these pages I wrote down 6 sections that I needed on each page:
Page Title: Obvious I know.
Dateline + Breadcrumb: I wanted to make sure these seemed like blog posts so the dateline needed to be included. I also know that a breadcrumb is considered a search enhancement in GSC so I make it a mandatory (and you should too!).
Intro: This is like any other blog post where you have an initial 2-3 paragraph section that catches the readers attention and keeps them moving down the page.
The Top List Entries: What I consider the main section of the page.
Closing: Similar style to the intro.
Related Pages: For SEO the main purpose for this is for internal linking.
Okay, so lets get into more detail for each of the six sections of the post.
Section One: Page Title
This section also includes the META (title, description) tags as well.
As I mentioned previously, since the goal of these pages are to be as automated as possible, I needed to come up with a, lets call it a Mad Libs format. Basically being able to change out specific parts of the content with content based upon the Amazon category.
To come up with this version of the title I simply Googled “most expensive Amazon products” and scrolled through the results on the first couple of pages until one stuck out that could fit the format.
This could easily be my downfall on why the CTR is low for my pages, but to test out these content type I just wanted to get something out to the world.
So the Mab Libs format I came up with …
Meta Title: Top %number% Most Expensive %category% Items You Can Buy on Amazon
Page Title: Here Are The Top %number% Most Expensive %category% Items You Can Buy On Amazon Right Now
Then using the PHP script I have for the website I just replaced %number% and %category% with the correct value.
I also added a little logic based upon the actual category name since some of them wouldn’t make sense says “Items” afterwards (“Books Items” for example). All I did was put flag for each category name that would omit “items” if it was set.
One feature that doesn’t show right now is starting in November each year the meta title will be updated with the next year’s year. So in November of 2021 the title would also include “[2022]” or “[UPDATED FOR 2022]”
Why?
Because I’ve noticed that when I search for any sort of recommendation (product, code, etc), if I don’t find what I want on the first try then I’ll add the year in the search to try and locate the most recent results.
For the meta description I used a similar format but added one additional field which pulled in information for a specific product:
Meta Description: We have found the most expensive %category% items currently on Amazon including a %product_1_name% selling for $#product_1_price!
My hope with this additional field is since these pages will be continually updated via Amazon’s API that Google will see these copy changes and consider the page updated. This is just a theory I’m running with on these page types.
Section Two: Dateline + Breadcrumb
This one I won’t go into too much detail on, however it is a section I’m also testing out a theory on in regards to the dateline.
On normal blog posts the dateline is the date / time the post was first published to the web. If any updates are made blogs normally add an additional line saying “updated on” as well as some meta information (“article:modified_time”). With these posts the on-page published date will change to whatever the updated (modified) date is. I’m not changing the published date in the meta information though, just on page.
This test is more about user interaction versus SEO. Going by personal experience I normally glance at the date of the article and if it’s too old then I move on to another source.
As far as the breadcrumbs go, after reading a post on Ahrefs about Google Sitelinks I have been making sure to include these feature on all of my sites.
Since Sitelinks are algorithmically generated I use breadcrumbs to influence them as much as possible. I’ve seen drastic increases in traffic when my search results include the Sitelinks enhancement.
Section Three: Intro
This section will use a similar Mad Libs style of writing that allows for this copy to look as personalized to the Amazon product category as possible … with one additional feature … multiple versions.
Instead of using the same Mad Libs copy for each Amazon product category, I came up with 8-10 Intro sections that could be easily switched based upon the product category. I debated automating this but at the end of the day decided that I would manually select which Intro went with which product category. Main reason was I wanted the copy to stay consistent versus randomly generated each time the page loaded.
And when I say “manually select” I set a field in the database for “intro_copy” and entered a number between 1 and 10 for each category.
So example of the copy looks like:
<p>From a %product_1_name% to %product_10_name%, we've collected these insanely expensive products available right now to buy on Amazon.</p>
<p>For some reason last week we found ourselves in, lets call it an endless "Amazon Shopping Hole", where we kept browsing through %category_name% and just couldn't find anything interesting to buy. So we ended up searching Amazon for the most expensive products and were rather amazed at what we found.</p>
<p>So to save your hours and hours of the mindless browsing of listings over at Amazon, here's a list of the top 10 most expensive %category_name_with_products% that you can currently buy on Amazon:</p>
As you can see it is using the same find and replace style as we’ve gone over before to give it the personalized feel.
Section Four: The Top List Entries
I wasn’t sure how much detail I’d need to provide for this section of the write-up as it seemed pretty straightforward.
When I looked at the data provided by the Amazon API, I narrowed down what I wanted presented to the product name, price, and the image URL.
From there I came up with a simple layout with the name and price on one side and the image displayed on the other. This simple layout also made it look nice on mobile.
I also added the “see product on Amazon” and hyperlinked the image as well to the Amazon product page.
NOTE: These included my Amazon affiliate code because that is one of the revenue generators for this website.
Section Five: Closing
This section is setup almost exactly like the Intro section we went over earlier.
Example:
<p>If you made it this far without getting into a never-ending online shopping scroll session over at %category_name%, CONGRATS!</p>
<p>We are still wanting to get those hours back!</p>
<p>Nevertheless we are working hard to keep this list of products updated on a regular basis and we actually just updated the list %last_update_day_of_the_week%.</p>
<p>We've also collected some most most expensive products of at Amazon lists to cure your boredom. Here are some that seemed interesting:</p>
<ul>
%other_top_lists%
</ul>
The only difference is the %other_top_lists% variable which is where the Related Pages list would be displayed.
I did add the %last_update_day_of_the_week% to this copy again to make it more personalized. Depending on the date the list was last updated, this copy would say one of the following:
Today
Yesterday
Day of the Week
Actual Date
I have no data behind this choice, rather it goes with wanting the reader to know how fresh the list data is.
Section Six: Related Pages
Right now this section pulls three random Amazon category pages on the site and then displays a text link to that specific category’s page. Since these are randomized on each page load they most likely won’t have the same internal link value in Google, but for the initial launch of this content type I was using them mainly to get users to keep visiting more pages on the site.
BONUS: Category Images
I’m counting this as a bonus because it isn’t required for SEO however I needed a way to make these pages look more blog-post style PLUS have an image for social sharing, which meant finding a related image.
My first thought was use the most expensive product for that specific page’s list of products, but those are so random in size (and quality) that I didn’t think it would work.
Enter Unsplash.
Although this is one of the manual pieces of the page build, taking a few seconds to search Unsplash for a related image is well worth it.
For example, if the product category was video games, I’d search Unsplash for video games and pick an image that grabs my attention and is in the 16:9 aspect ratio that Facebook likes for social share images. It doesn’t have to be perfect and I just mainly look for horizontal images.
I make sure throughout WTE that I have a disclaimer / callout in the footer area mentioning photos on this page are provided by Unsplash. If you use their API they require you to link back to the source, but since we aren’t using the API I still want to give them credit because they are a badass service.
Wrapping this up
If you made it this far in the email, congrats!
I wanted to make this guide as detailed as possible so I apologize if it felt like you were reading the last Harry Potter novel.
I also know I skipped over the actual PHP code, etc. but the main goal was to show how to utilize data that everyone has access to and present it to the end user in a highly customized / personalized manner that hopefully will also be beneficial for SEO.
If you want any more details on this, please reply back to this email or hit me up on Twitter.
So what’s next?
Good question.
This post took me 2-3 hours to write up and I enjoy sharing all this information with you, however I won’t be able to do this in-depth write up each issue.
The next issue will focus on how WTE is performing and any updates I’ve made.
I’ll also feature a few resources (videos mainly) that I used to make some of the SEO decisions / updates to the website.
And remember … I’m always available for questions. Reply back to this email or find me on Twitter (@scottcents).
Also if you found this valuable and wanted to share it with your friends, feel free to click on the share buttons below.
Thank you!
Website URL: https://wowthatsexpensive.com
Analytics Dashboard: https://plausible.io/share/itkhHqEPj61bH1_JcQHlY
Ahrefs Site Explorer: https://ahrefs.com/site-explorer/overview/v2/subdomains/live?target=wowthatsexpensive.com%2F
^^^ note this use to be a public facing URL. I’m going to check with the Ahrefs team to see if there is a way to make it public again.


